Difference between revisions of "Ribbon7k monitoring profiles"
| (7 intermediate revisions by 2 users not shown) | |||
| Line 5: | Line 5: | ||
On the SBC navigate to All > Profiles > Services > Monitoring Profile. The Monitoring Profile window displays, containing the table Monitoring Profile List. | On the SBC navigate to All > Profiles > Services > Monitoring Profile. The Monitoring Profile window displays, containing the table Monitoring Profile List. | ||
| + | [[File:Ribbon_tls_monitProfile.png]] | ||
| + | |||
| + | |||
Modify the monitoring profile to send only TLS signaling to the remote server: | Modify the monitoring profile to send only TLS signaling to the remote server: | ||
| + | [[File:Ribbon_tls_ProfileEdit.png]] | ||
| Line 17: | Line 21: | ||
tshark -i pkt1 port 9514 | tshark -i pkt1 port 9514 | ||
| − | Assign the TEST_Monitoring_Profile to the Sip Signaling Port | + | =Assign the TEST_Monitoring_Profile to the Sip Signaling Port= |
| + | [[File:Ribbon_tls_assignMonitProfile.png]] | ||
= Verify on the monitoring server = | = Verify on the monitoring server = | ||
| Line 24: | Line 29: | ||
| − | + | ||
| + | |||
= Incorporating source and dest IP with monitoring profile = | = Incorporating source and dest IP with monitoring profile = | ||
You may also need the source and destination IPs incorporated in the feed to the monitoring server. Under Header add the source and destination IPs to the selected monitoring profile. | You may also need the source and destination IPs incorporated in the feed to the monitoring server. Under Header add the source and destination IPs to the selected monitoring profile. | ||
| + | [[File:Ribbon_tls_incorporatingIPs.png]] | ||
This gets the source and destination IPs incorporated in the SIP signaling sent to the remote server. From here the data can be injested and processed by the far end server. The packets appear as follows on the far end server. | This gets the source and destination IPs incorporated in the SIP signaling sent to the remote server. From here the data can be injested and processed by the far end server. The packets appear as follows on the far end server. | ||
Latest revision as of 08:35, 25 April 2024
Use the monitoring profile
For getting the TLS signalling decrypted by ribbon SBC:
We will use the Monitoring Profile feature to send only TLS decoded signaling to a voipmonitor server
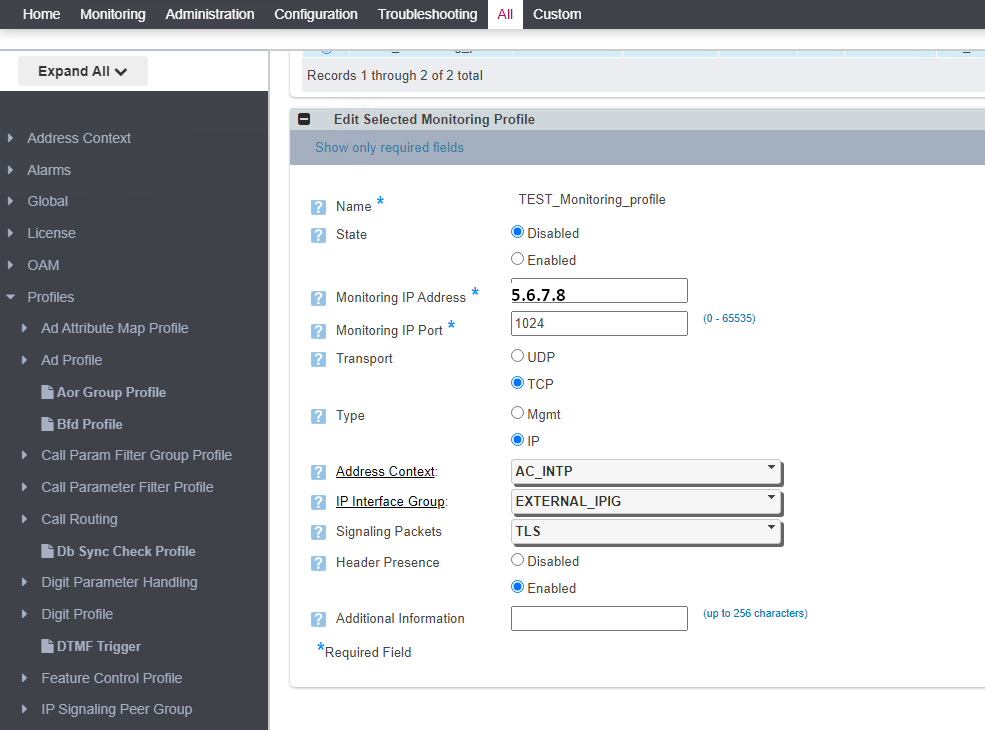
On the SBC navigate to All > Profiles > Services > Monitoring Profile. The Monitoring Profile window displays, containing the table Monitoring Profile List.

Modify the monitoring profile to send only TLS signaling to the remote server:

Execute the following CLI command (on Ribbon host)
set addressContext AC_INTP zone INTERNAL_IPIG sipSigPort 1 monitoringProfileName TEST_Monitoring_Profile
The syntax:
set addressContext <address_context> zone <zone_name> sipSigPort 1 monitoringProfileName <monitoring_profile_name>
Verify that SBC are sending data
Verify on the SBC that the data are traveling to the remote server:
tshark -i pkt1 port 9514
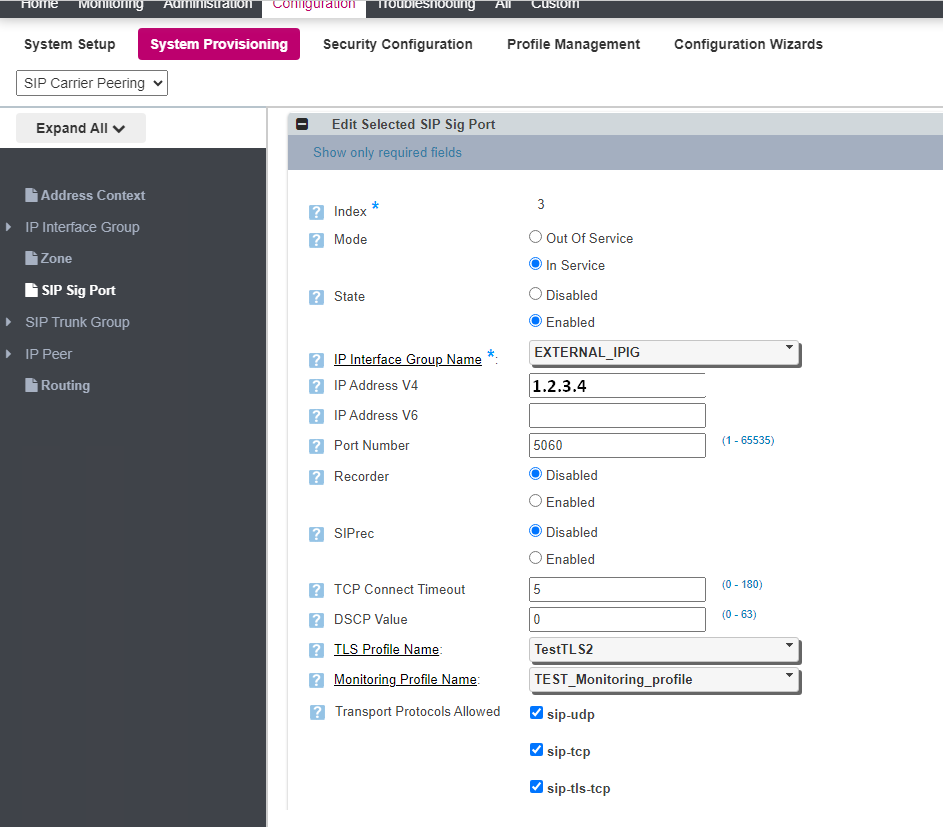
Assign the TEST_Monitoring_Profile to the Sip Signaling Port
Verify on the monitoring server
that the packets are arriving from sbc:
tcpdump -i any port 9514 -w /var/tmp/Capture_Mar26_fromRibbon_TLS_only.pcap
Incorporating source and dest IP with monitoring profile
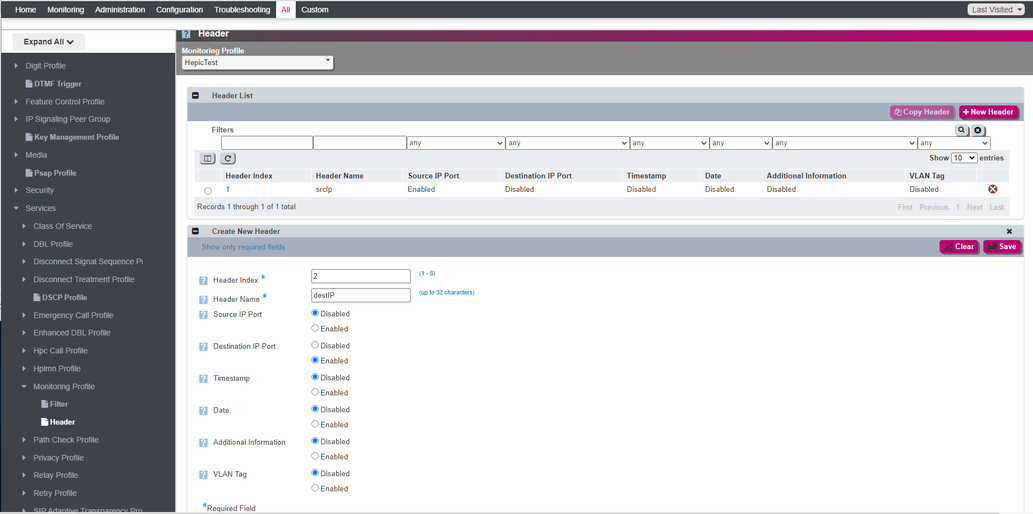
You may also need the source and destination IPs incorporated in the feed to the monitoring server. Under Header add the source and destination IPs to the selected monitoring profile.

This gets the source and destination IPs incorporated in the SIP signaling sent to the remote server. From here the data can be injested and processed by the far end server. The packets appear as follows on the far end server.
The source: Ribbon's site at https://doc.rbbn.com/display/SBXDOC121/Services+-+Monitoring+Profile
